Friday 6 May 2016

Tandoori Quorn Pitta Pockets

Ever since I have been eating only vegetarian food I have been experimenting with Quorn products and trying to make them as tasty as possible. I love the chicken style pieces and thought why not make a vegetarian version of tandoori chicken kebabs. So I through a couple of ingredients together and came out with a fantastic end product. 
This recipe is so quick and easy and super delicious, I hope you give it a try !

Ingredients:
1 packet of Quorn chicken style pieces
1 heaping Tbs of Tandoori powder or paste
Greek style yogurt as needed for the marinade
1 squirt of tomato puree
Mint sauce as needed
one small onion (diced)
Himalayan salt as needed
black pepper as needed
Tabasco sauce (optional)
1 packet of pitta bread
Romaine Lettuce or lettuce of choice.
1 tbs vegetable oil

Method and preparation:

Add a little vegetable oil to a large pan and saute the quorn pieces until golden brown and turn of the heat.


Now prepare the tandoori Marinade by adding about 3 to 4 heaped tbs of Greek style yogurt into a bowl along with the tandoori powder/ paste, Tomato puree and Tabasco sauce and give it a good stir. Check and adjust seasoning as needed.


Add the marinade to the quorn pieces and give it a good stir.


At this point you can either leave it in the fridge to soak up the flavours for half an hour or longer or like me cook it like it is.

Put some parchment paper on a baking sheet and arange the quorn pieces on it.


Now bake them in the oven on 180 for 10 minutes or until you see the authentic charred edges around the pieces.


To make the Yogurt and mint sauce, Add some yogurt into a bowl along with a dollop of mint sauce, diced onion and salt and pepper to taste.


Now warm your pitta bread in the oven on 180 until fluffy but slightly crisp.


Wash and dry the romaine lettuce.


Now it's time to assemble the Tandoori pittas :)

Make a slit in the pittas to make a pocket. 
Spread some yogurt sauce on the bottom layer.
Add a lettuce leaf.
Add some quorn pieces.
Enjoy :)


I hope you enjoy this recipe, I'm sure even meat eaters will love this one ;) 

Thank you for stopping by my blog :)

Thursday 21 April 2016

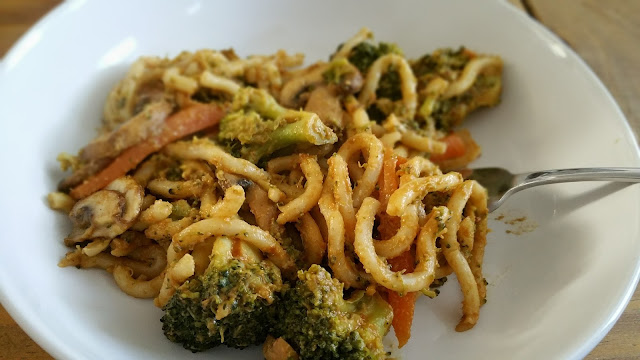
Vegetable Udon Noodle Stir fry With spicy peanut sauce.

I absolutely love Stir fries so I decided to make this quick and easy Vegetable Udon noodle stir fry with a Spicy peanut sauce. The possibilities are endless of what you can add to the sauce but I used what I already had in my trusted cupboards.
If you like stir fries I'm sure you'll love this recipe :)


Ingredients:

1 head of broccoli (steamed florets)
1 sliced onion
1 large carrot chopped into matchsticks
sliced mushrooms ( I used 6 chestnut mushrooms)
1 clove of garlic or garlic powder 
soy sauce
1 tsp English mustard
3 Tbsp of smooth natural peanut butter
Chili flakes as needed
Sriracha as needed or any hot sauce.
1 packet of Udon noodles
Warm water to adjust the thickness of the sauce.
Salt ( just a pinch)
Pepper ( as needed)
1 tbs of vegetable oil for sauteing 

Method and preparation:
Steam the broccoli florets until tender but not too soft.
Chop the veggies and set them aside.

Now prepare the spicy peanut sauce.
Add 3 Tbs of smooth natural peanut butter into a bowl, give it a quick stir to loosen it up a little bit.
Now add a few splashes of soy sauce, a few chili flakes, Garlic powder, Sriracha, English mustard and a little warm water and gently mix it to a paste.
Add more water as needed to adjust the thickness of the sauce.
Do a taste test and add more of the ingredients if needed.

Now prepare your your noodles.

Whilst your noodles are cooking, In a large wok or pan, add a little vegetable oil and stir fry the onions, carrot and mushrooms.
Ones the onion is tender, add in the broccoli and give it a mix.
Add a pinch of salt and pepper and stir .

Now add in the spicy peanut sauce and stir it through the vegetables.

Drain the noodles and add to the noodles and gently mix through.
If you feel that the stir fry is too dry, feel free to add a splash of water or soy sauce to it.
Heat gently and serve and enjoy :)


I hope you try this recipe out, It's delicious.
This sauce can also be used as a dip :)


Saturday 6 February 2016

Cloud Bread

since indulging in lots of goodies during Christmas, I thought I needed to give my body a break and start getting healthier. So as I have cut out carbs I have not been eating bread. I love sandwiches so I thought I'd find a recipe for low carb bread . I saw lots of recipes and then came across  Cloud bread and I just had to make it.
It's delicious and fluffy and delicate and great for sandwiches too :) And best of all takes no time to make and requires just a handful of ingredients .

Ingredients:
3 tbs of full fat cream cheese (philly)
3 medium eggs (separated)
1 tsp baking powder or cream of tartar
1 tsp sweetener (optional I used coconut palm sugar)
salt to season
pepper to season
garlic powder to season (optional)

Method and preparation:

pre heat your oven to 150 c/ 300
Line a baking sheet with parchment paper.

separate your eggs into too bowls.
Add the cream cheese and seasonings to the yolks and mix until you get a pale yellow smooth batter.
Add baking powder or cream of tartar to the egg whites.
Whisk your egg whites until they form stiff peaks.

Now very gently fold the egg yolk batter into the egg whites without deflating them .
Working as quickly as you can spoon dollops of the mixture onto the baking tray and shape them into bun sized circles.
Mine made six buns (tops and bottoms so it can make 3 sandwiches .
You can use two trays if you make them smaller.

Bake them in the oven for 18-20 minutes until they are golden brown.

These buns are very delicate so please wait until they are completely cool before attempting to remove them from the tray or they will break.


The backs of the buns.


You can enjoy them right away or let them cool and put them in a zip lock bag and in the fridge over night to eat them the next day when they are fluffy and chewy.


These keep on the counter for up to 4 days and in the fridge for 5 days. They can also be frozen to eat as and when you please :)

I hope you try this delicious cloud bread recipe. You won't be disappointed.

Here is a serving suggestion :)


Thank you for stopping by my blog.

Hasselback chicken with cherry tomatoes and mozzarella

If you're looking for a healthy but yummy comfort dish that is quick and easy to make and super delicious, then look you've come to the right place :) This Hasselback chicken is so tasty and easy you need no time to make it.

Ingredients:

Chicken breasts ( I used 3 large)
salt to season
pepper to season
chicken seasoning ( I used peri peri )
shredded mozzarella (as needed)
cherry tomatoes ( as needed)

Method and preparation:

Pre heat your oven to 180 c/350 

Trim the fat off the chicken breast.

Make deep slits along the chicken breasts being careful not to cut all the way through.


Now season the chicken with salt and pepper and chicken seasoning.


Now gently stuff the tomatoes and mozzarella in the slits of the chicken.


Bake in the oven for 30 minutes or until chicken is cooked all the way through.
Remove from the oven after cooking time is over and serve :).


 Enjoy with your favourite side.

Serving suggestion:


I hope you try this recipe and thanks for looking :)
Happy eating folks.

Sunday 31 January 2016

Peanut butter and banana choco oatmeal cookies

These deliciously healthy cookies are sooooo tasty and very easy to make. You can taste every ingredient in them.
They are not crispy like other cookies, but soft and chewy and yummy with a glass of your favourite milk.

Ingredients:

1 ripe banana
1/2 cup of peanut butter (natural)
1/2 cup of oats
1 Table spoon Raw cacao powder
1 tsp vanilla extract ( I used my home made one)
a pinch of Himalayan salt

Method and preparation:

Preheat your oven to 180c 

Mash the banana and add it to a large mixing bowl. Then add in the peanut butter, oats, cacao powder, vanilla extract and Himalayan salt.

 
Now stir the ingredients together to form a sticky batter.
Line a baking sheet with parchment paper and roll out golf ball sized balls and put then on the baking sheet.


Now use your finger to gently press the cookies flat to the size that you want them. 
These cookies don't spread whilst baking so don't worry about getting them too close to each other.


Now bake for 10 - 15 minutes depending on your oven. Mine took just under 15 minutes, so keep an eye on them.

Once the cookies have baked , take them of the baking sheet and leave them to cool on a cooling rack for about 10 minutes( If you can )


Plate them up and enjoy with some yummy Almond milk or whatever you prefer :)

I hope you like this recipe. Please let me know if you try it out :)